Friday, December 16, 2011

Madly in Love with Mercury

Greetings fellow crafters! Remember me? Laryssa? Now that I am finally done with school, I am excited to fully commit myself to this blog. So that being said, with the holidays all around us one thing I have been admiring at the craft stores lately is mercury glassware. I absolutely love the look of it (but not the price). so I thought, why can't I just transform my own glassware into silver bliss? well I can and I did. 

 So this project is so easy there should be a law against it. For your supplies you need Krylon: Looking Glass Spray paint (this is easily obtainable and they sell it in most hardware and craft stores, I got mine at Walmart for around 8 bucks), masking or painters tape (optional), a plain jane spray bottle filled with plain jane water, and your glass ware. I got mine from the dollar store for a buck a piece but you can use some you have laying around the house or some from a thrift store.
 This is the optional part; you can paint your whole glassware or you can tape off the parts you don't want painted with masking or painters tape. I didn't want the stem of my goblet painted and I did a fun unique design on the smaller vase.
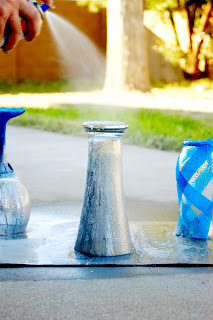
 Next, you put your spray bottle to work and generously spray your glass (I flipped mine upside down to spray because I wanted it to be more stable, it was a little windy)  Don't be shy with the water.
 When your done, throw the spray bottle to the side and grab your Krylon: Looking Glass Spray Paint (make sure you have a screw driver handy to pry the top off... sad to admit it but, I almost lost that battle)  Spray away! It looks a bit odd going on but trust me it works. I did two coats just because one coat wasn't to my liking, but one would do the trick too. I find it best to spray the second coat almost right after you spray the first one, you want the glass to still be wet when you spray.
 This is my unique, experiment glass. I figured you can put on any design you want using masking tape, rubber bands, or vinyl lettering ( I think monograms would go great on these! And since its so easy, it would make a fun, creative, personalized and thrifty gift!)
 Now it's time to go inside and do some internet surfing til it's dry!
 It looks so awesome!
 It only takes about 5 to 10 minutes til  its dry to the touch and about an hour til you can handle it.
 When it dries, peel off the tape carefully.

 There may be some tape residue that you need to clean up. I used a q-tip dipped in goo gone. Make sure to not get the painted part wet yet, it still needs time to set in.
 For my large vase I did a little side project, I glued a candle stick that I found at the dollar store to the bottom of the vase using China and Glass glue, once again this glue is available at craft and hardware stores and depending on what brand, it is fairly inexpensive.
Press and let dry. ( Please ignore my nail polish...I must have either been very bored or temporarily insane)
Find a cute vase filler and your done! I choose some sprigs of silver and purple flowers for my extremely cute hurricane and some adorable mini Christmas ornaments for the other, but you can put all sorts of fun things in them; Tea lights would be cool to see too. Try it and tell us what you think!
 
PhotobucketTip Junkie handmade projectsPhotobucket
The DIY Show Off

Thursday, December 15, 2011

Let's Talk Laundry

I will admit that the first time I heard ofmaking your own laundry soap, I cringed a little. I am particular about mylaundry soap. It must clean extremely well and it also has to smell good. GainApple Mango Tango has been my detergent of choice for the last 4-5 years. Ilove the way it cleans and the smell is AMAZING! It met my every requirementwith the exception of the price tag. We usually buy the size that says it contains 48 loads for $10.97 (Wal-Mart price). Now, one might think that$10.97 is not that expensive but let’s add in fabric softener. I liked the coordinatingGain Fabric Softener for $4.47 for 52 loads. Both lasted us around 3 months sothe approximate cost per year is $60-65. You might not think that’s too bad butI could use all the extra money I can get (gottapay for my craft addiction somehow). 


So when I discovered the price of homemade laundry detergent, I couldn’t NOT try it. It is INSANELY cheap! Try approximately $28…A YEAR! That’s based on 6 loads of laundry a week (It’s just me and Mr. Awesome at home so we normally only do around 4 which means this will last around 18 months!How is that not the best news you have heard all day...maybe even all week. Trust me, Mr. Awesome was beyond excited and totally on board when he found out the price.


Once it was decided that I would give this a go, it was a must for me todo some research. I looked up a ton of recipes. I tried a small batch of one,wasn’t as impressed as I had hoped so I went back and did more research andeven more after that until I finally settled on the recipe that I thought wouldbe best. I mentioned it to Courtney and she decided to give it a try also so wewent to Wal-Mart to buy our supplies and then headed over to my house to makeus some soap.


Alright, are you ready for the recipe?

You will need

1 (4 lb 12 oz) Box of Borax- Found in the detergent aisle

1 (3 lb 7 oz) Box ofArm & Hammer Super Washing Soda- Found in the detergent aisle

1 (3 lb) Container of OxyClean- Found in the detergent aisle.(This is optional but I recommend adding it)

2 (14.1 oz) Bars of ZoteSoap- Found in the detergent aisle (we chose to do pink for the scent but thewhite would be just fine. You can also use Fels Naptha)

2 (2 lb) Boxes of Arm & Hammer Baking Soda- Found in thecooking aisle (You could also get 1 4 lb box, we just couldn’t find it when wewent)

1-2 (55 oz) Bottle of Purex Crystals Fabric Softener- Found inthe detergent aisle (This is 100% optional. Like I said, my laundrydetergent must smell good and I really like soft towels)

This is such an easy recipe. The hardest part is grating thesoap so let’s get that out of the way. We used just a regular cheese grater andgrated into a large mixing bowl. I have read that some people use foodprocessors and have good luck. Just for kicks, we attempted it in the blender…itdoes not work. I’m hoping to have a food processor before I have to make mynext batch. The soap does seem to dissolve just fine, even in cold water. Now thehard part is over.
We used a large bucket that we got from my Father-in-law (Courtney’sDad…didyou know we are sister-in-laws?) All that is left is to mix everything together. We took alayering approach to the mixing. We put in a little of everything, mixed it up,then put in some more, mixed it up, then added the rest and mixed it up reallywell.


Now, you can either keep it in the bucket and dish it out fromthat each time you do a load, or you can refill a smaller container. I optedfor the smaller container and in a stroke of geniusness, we discovered that thePurex Bottles were 1.) The perfect size and 2.) The caps that come on thebottles have measuring lines and the middle line is just the perfect amount(you want to use 1-2 Tablespoons per load depending on size…I usually always opt for2 though)
That’s all there is to it. Pretty easy right? We thought so.

I thought that it would be a good idea to get some opinions anddo some reviews so I have given some samples to some people and will post theirreviews as they come in. I would also LOVE to hear from you and get yourreviews on it. You can email us at ourdiydiaries@gmail.com(and I’ll publish some of them) or you can leave your review in the commentssection.


I’ll (Jen) start…I LOVE THIS STUFF! I think it cleans well and Ireally like the addition of the Purex Fabric softener. I did decide to add asecond bottle to my batch for extra softness and smell though and wouldrecommend it to those who want a stronger scent. Minus the Fabric softener, itis extremely mild in scent. It did take a little while to get used to the factthat it doesn’t suds (I kept thinking that I didn’t add enough, but trust me,you did) It just isn’t a sudsy soap. It works so well though and Mr. Awesomethinks so as well. We will definitely be using this from now on!


Courtney: So far so good. Besides the time consuming of thecutting the cheese, I mean soap, it was easy to make. I have never been a highquality type of girl so it not being a brand name doesn’t bug me at all. I wasworried about the hub’s sensitive nose, but he has no problems with it. I am sosurprised by how much is needed. I often find myself having to pour some backin the container.


Marla (Jen's awesome Mom):I used it on a couple batches of laundry and it seems to clean very well and itdidn't have a perfumey smell that would bother my sensitive nose. Sofar so good! I will continue to use it. 

We would love to hear from you! Tell us if you give this recipea try and how you like it or let us know if you have a different favoriterecipe. 

Sunday, December 11, 2011

Pretty in Purple


Do you remember in this post when I said that, despite all the awful mishaps that went wrong, this dresser would turn out awesome? Well I stuck to my stubborn roots and finished it and it. is. AWESOME! I am very happy with how it turned out and even happier to finally have it done and serving its purpose in our home. The day I finished it was by far a great day. I got it in the house and all set up just before Mr. Awesome came home from his last final of the semester! Yippee for no school for the next 7 weeks (yes you read that right...7 weeks!) I can't wait to make my 5 mile long Honey Do List and I'm sure it will make him long to be back in school. 


Alright, enough chit chat, meet the newest member of our Living Room Family!
 Ol' Purple went from this
To this...nothing but a miserable failure
 Then after much stripping and sanding, I prepared to start ALL OVER! 
My creative attempt at keeping paint from getting inside the drawers....Black Friday Ads worked wonders
Then after a coat of primer, I had a little of my faith restored
I highly recommend using a grey primer if you are painting a dark color
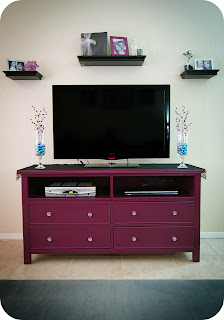
Finally, it became this beauty, and I love it. 
I did decide that I wanted to tone down the top a little as well as add some texture and what better way to do that then with some pretty black lace?
Courtney found this tutorial  which inspired these lovely hurricanes that I filled with mini turquoise ornaments (on sale at Joann's for $2.50 a box) and this purple beaded branch (on sale at Joann's for $1.00) The total price to make this hurricane? $5.50! Awesome! I placed one on each side of the tv and called it good. 

One last look at the before and after...

Linking to
The DIY Show Off Making Monday Marvelous Linky PartyPhotobucket Photobucket